






































































About Documentation
The question of how to use the manual sounds odd in the first moment. Yousimply read it! But there are a few things to know before you canreally find easily what you are looking for. Because using a 3dsoftware requires some special 3d knowledge. And it needs a bit ofknowledge about Bforartists to understand the structure of themanual. So that you can find what you need, both, from coming thesoftware side, and from coming the manual side.

General Structure
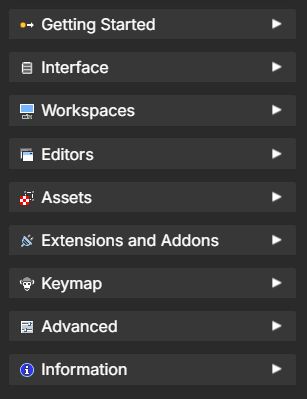
The manual is organized into groups of chapters to help you find information quickly.
Here are some descriptions of the chapter groups:
Getting Started
Covers the basics of Bforartists. Here you’ll find installation steps, first launch guidance, and a quick overview of the interface fundamentals. This also helps migrating from Blender and using your Blender settings. It’s the best place for new users to begin.
Interface
Explains the layout and controls of the software. This includes windows, areas, editors, shelves, menus, and panels. It helps you understand how the program is organized visually and functionally.
Workspaces
Introduces workspace editor presets that group editors, modes and tools for specific tasks, such as modeling, animation, or compositing. Workspaces let you switch quickly between different workflows. These are also short hands to different parts of the documentation for in-depth exploration.
Editors
Details each editor type in Bforartists, from the 3D View to the Node Editor. Every editor has its own chapter explaining its areas, modes, object types, shelves, menus, properties and tools.
Assets
Covers the Asset Browser and how to manage reusable content like materials, objects, and node groups. Assets make it easier to get working quickly.
Extensions and Addons
Explains how to install and use addons and extensions. These expand the functionality of Bforartists, adding new tools or automating workflows.
Keymap
Documents the keyboard shortcuts and input system. It shows the default keymap and how to customize it to fit your personal workflow.
Advanced
Provides specialized topics such as scripting, data structures, and performance optimization. This section is aimed at users who want to go deeper into technical control.
Information
Contains miscellaneous references such as version details, credits, and background information about the project. It’s the place for general notes and supporting material.

Interface Types
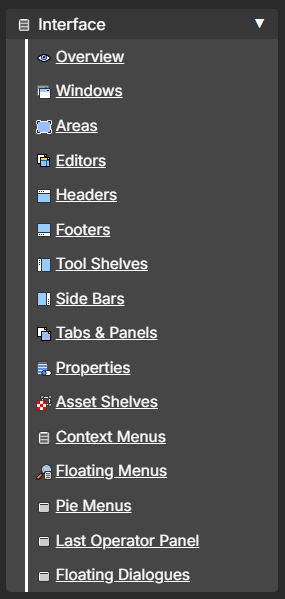
Before diving into each editor, it’s important to understand the shared interface elements. These appear across nearly all editors in Bforartists and give the software a consistent structure. Knowing them will help you navigate any editor more easily.
Windows
Windows are the main containers of the interface. Each window can hold one or more editors, and you can split or join them to customize your workspace. Here you can learn how to manage the main window and secondary windows.
Areas
Areas are subdivisions inside a window. Each area hosts an editor, and you can resize or rearrange them to fit your workflow. Here you can learn how to resize, duplicate, split and float areas.
Editors
Editors are the functional parts of the interface. Examples include the 3D View, Outliner, Properties Editor, and Timeline. Each editor has its own tools and purpose.
Headers
The header runs along the top of an editor. It contains menus, options, and tool settings. This is where you’ll find commands specific to the editor you’re working in.
Footers
Some editors include a footer at the bottom. It often provides status information or additional controls related to the editor’s content.
Tool Shelves
On the left side, many editors have a tool shelf. This is where you’ll find the main tools and operators for direct interaction.
Side Bars
On the right side, editors often include a sidebar. It contains panels and tabs for adjusting properties, transforms, and add‑on settings.
Tabs & Panels
Tabs group related tools, while panels provide detailed controls. They keep complex options organized and easy to access.
Properties
Editors often display properties related to the active object, tool, or mode. These properties let you adjust values directly for precise control.
Asset Shelves
Some editors include an asset shelf, giving quick access to materials, objects, or node groups stored in the Asset Browser.
Context Menus
Right‑clicking opens a context menu. These menus provide quick access to relevant commands based on your selection.
Floating Menus
Certain actions open floating menus, temporary overlays that give you fast access to tools without leaving the viewport.
Pie Menus
Pie menus are radial menus that let you select options quickly with directional input. They are designed for speed and efficiency.
Last Operator Panel
After performing an action, the Last Operator panel appears to the bottom left of the Editor. It lets you adjust the values of the most recent operation, such as moving, scaling, or extruding.
Floating Dialogues
Some tools open floating dialogues with additional options. These appear when a tool requires more input before it can be applied such as warnings, wizards or dialogues.

Workspaces and Editors
The search panel at the top left is your fastest way to find specific topics. Type in keywords like “Curves,” “Modifiers,” or “Animation,” and the search will return relevant chapters and sections. The Discover button helps you explore related content, making it easier to learn beyond your initial query.
Search Query
Here you can write what you will like to find.
Discover Button
This will ill load a new page showing results from the search, linking to relevant chapters by keywords.
Modes
Object Types
Editor Areas
The left sidebar is the main index of the manual. It organizes chapters into expandable sections such as Getting Started, Interface, and Editors. This is your primary navigation tool for browsing the manual. You can expand or collapse sections to focus on the topics most relevant to your workflow.
Panels
Each panel has a group of chapters related to a central topic. If you click on the panel title, it will take you to an index page giving a short description of each chapter.
You can also click on the arrow to collapse the panel and momentarily hide it foe easier focus on different groups of chapters.
Chapters
Each link in each panel are the top level chapters. Each chapter is a new page with sub-section you can navigate later. When you click on the link, you will be able to discover more.

Menus, Options, Tabs, and Panels
On the right side of each page, you’ll find the chapter section navigation. This lists the headings and sub‑headings for the current page, allowing you to jump directly to the part you need. It’s especially useful for long chapters with multiple panels or operators.
Section Panels
These panels show each chapter section headers, so you can see a hierarchy of points and sub-points.
Sub-sections by Header links
Here you can click and it will take you to a page anchor for that section and sub-section header.

Utility Buttons (Top Right)
The button in the top left corner provides additional controls for how you view the documentation.
- Collapse all navigation panels to maximize reading space.
- Print the page directly for offline reference or study.
- Expand the view again when you need the sidebars back.
These button are designed to give you flexibility, whether you prefer a clean reading experience or a fully navigable interface.
Footer Navigation (end of page)
WIP

Conclusion
By combining breadcrumbs, search, the main index, section navigation, and utility controls, the documentation interface ensures you can always find your way, whether you’re exploring for the first time or diving deep into advanced topics. It’s built to be approachable, efficient, and supportive of both quick lookups and extended study. Hope you like it!