

Overview
Introduction
This is a step-by-step tutorial packed with tips and tricks to help you compile your first Bforartists build –opening doors to develop your artistic ideas with the source code.
Outline
To compile, we first need to gather the correct tools, materials, and blueprints, and then we can build the “house” - which is Bforartists.
The following documentation will explain each process step by step with tips and tricks to make sure you can troubleshoot and build without any errors.
Once you have no errors in the building process, you will be free to work in a Github branch to commit and push new improvements to Bforartists – starting with established tasks that can be worked on collaboratively and approved to be included in future official releases.
So let’s begin by getting the right tools, then the correct materials and blueprints – then we can use the tools to build our house.
Enjoy! 😉
More Information
If you want a minimal and technical guide, you can checkout the official Blender documentation to assist. Otherwise this guide will help you understand the process and follow clearly.
Blender DocumentationIt is recommended to try get Blender compiling on your system first, then it may make life easier when trying to compile Bforartists later.
2. Download Tools
Required Tools
Building Tools
Microsoft Visual Studio 2022 Community
This is used to build the software.
Alternatively, you can also use the Microsoft Build Tools for command line builds.
CMake
This is used to build solution for Microsoft Visual Studio or other C++ compilers to compile.
DownloadSourcing Tools
Git
This is used to pull the repository and do development with file versioning.
There are multiple ways of installing Git, from the Desktop Client to other methods, this is the one we recommend.
This is required to pull, commit, and fetch updates from the repository.
SlikSVN
You may also need also SlikSVN since TortoiseSVN will not work from the command line, thus a make update will not work.
This is required to pull submodules.
Tortoise Git (optional)
This give a handy right click context menu to manage Git commands through a visual and iconized GUI. Also has a merge tool.
This integrates into your Explorer context menu.
Tortoise SVN (optional)
This is used to download SVN (legacy) dependencies that are not stored on LFS.
Other Tools
GPU Depdendencies
For Cycles GPU architecture, this requires setting environment variables and installing the relevant toolkits from each vendor.
Learn MoreVisual Studio Code
An opensource code editing software that can integrate GIT and other python and C++ extensions to assist in merging, editing code, searching for variables and more. You can also personalize with LLM assisted agents and work.
This also can be used to build.
Void Editor
An opensource fork of Visual Studio Code with integrated and free Code Agents based on LLM assisted system, highly recommend!
Pair this with Openrouter.ai to use any LLM on the market.
Optional Tools
Listary
This is an alternative to Grepwin that integrates into the Windows file selector to search quickly and globally for matching files and folders. Opensource and free.
3. Get Access
This step is required to get the Builder credentials. We have the tools, but we need to become the builder. This step helps us get those credentials.
Signing into GitHub with SSH
This is needed to be able to download LFS files and get access to the repository to later commit and push. This can be done directly with Git or configured into Tortoise Git. We will show how to do this with Git below.
As much as this is opensource, the Github and Blender servers have a bandwidth limiter requiring SSH authentication, and thus requires Github credentials to use. We are looking into an alternative, but this may take some time.
More information from Github: https://docs.github.com/en/authentication/connecting-to-github-with-ssh
🧰 Step 1: Generate an SSH Key
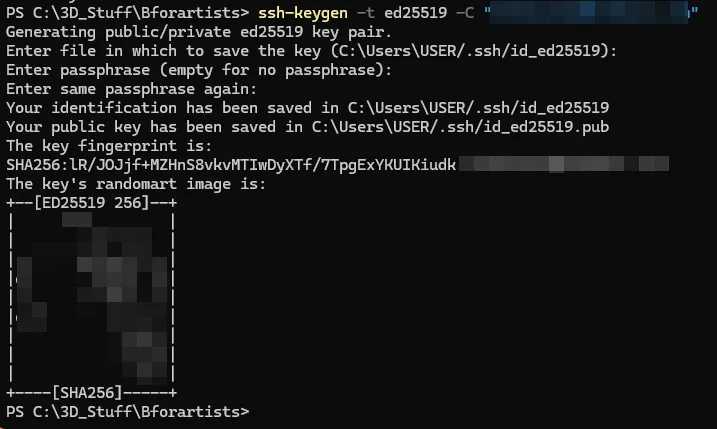
Open Command Prompt, PowerShell or Git Bash and run:
ssh-keygen -t ed25519 -C "your_email@example.com"
- Press Enter to accept default file location.
- Press Enter again to use default user name and password
- Optionally set a user name and password for extra security.
Your keys will be saved in ~/.ssh/id_ed25519 and ~/.ssh/id_ed25519.pub.
The "ed255199" is a modern cryptographic algorithm used for creating secure digital signatures.
~/.ssh/id_ed25519 is a private key
~/.ssh/id_ed25519_github_andres.pub is a public key
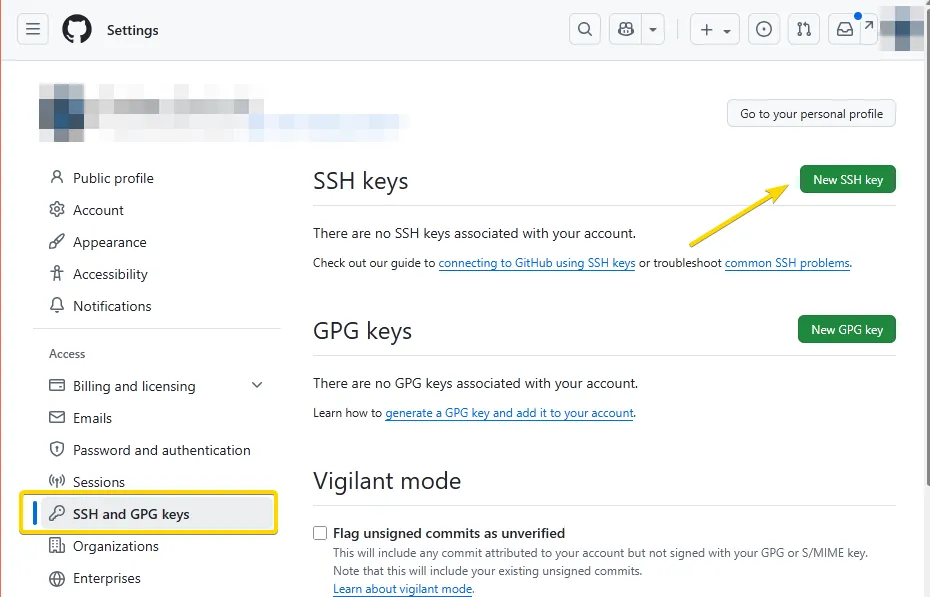
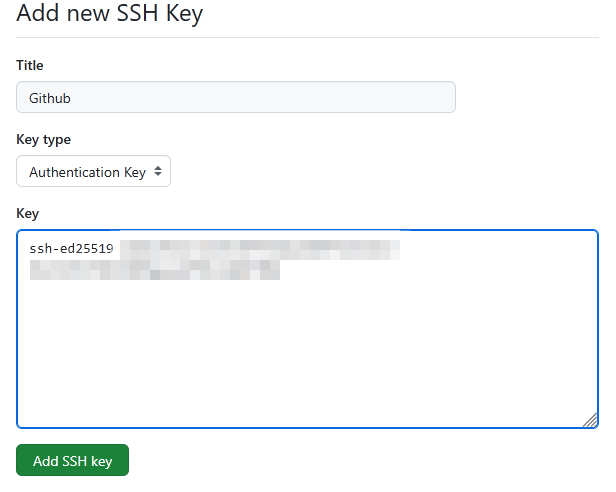
📋 Step 2: Add Your Public Key to GitHub
Copy your public key from the console:
get-Content ~/.ssh/id_ed25519.pub
Then register the generated SSH key to Github:
- Go to GitHub SSH settings
- Click New SSH key to the top right in green
- Paste the key
- Give it a name to remember
- Then save
🧠 Step 3: Test the Connection

In the console, you now need to run the following to poll with the github server:
ssh -T git@github.com
- This will prompt if the public key fingerprint is matching.
- Find the public key here: https://docs.github.com/en/authentication/keeping-your-account-and-data-secure/githubs-ssh-key-fingerprints
- Compare the output. If the number is the same, then confirm and type "yes"
If successful, you’ll see a message like this:
Hi username! You've successfully authenticated.
If there is a warning that Github does not provide shell access, this ok.
✅ Step 4: Start working with SSH
From here on, Git will use your SSH key—no more typing passwords or tokens. Now you can clone a repo using SSH and we can move onto the next step.
I have yet to confirm if you need to spin up your SSH session every time you want to pull and commit, but there may be a way to do this automatically with your IDE or TortoiseGit
4. Download the Materials
Now that we have the builder credentials, and all the tools - we now need to get all the materials to build this house.
To do this, we need to clone the Bforartists repository to our local harddrive.
You will ultimately need to use the Powershell or Command Prompt to update and do this.
1. Set a Source Folder
This is to store your copy of the Source Code. Create a folder on your computer where you have read and write permissions, this is to store all repositories in a short-hand kind of way.
This guide will assume your chosen folder is C:\[Repository Path]
2. Prepare LFS
To get all the materials, we need a special pickup truck to bring it to the construction site. This is what we calll LFS, Large File Storage. First time you do this may fail unless we install LFS with the ability to skip failed pointers to missing files from the Blender or Bforartists servers.
Open the terminal, then run this command to install the correct and robus method of LFS:
git lfs install --skip-smudge
Important: If you checkout and fetch LFS files from the remotes without skipping the smudge (default), it might say files are missing. This is due to LFS not populating to older branches by Blender.
In general process is done automatically through ./make updatecommand. But first use--skip-smudgeto "force" the trip to get the files. After doing this, we can continue to the next step.
3. Clone with SSH
Now that we have the pickup truck, credentials to be builders, the tools -let's now focus on getting the building materials.
Navigate to the path you want to clone to
cd "C:\[Repository Path]"
Download the Repository
This is done by cloning the online repository on the server to your computer with a local copy. This is where we will work in the future.
To clone Blender with SSH to test:
git clone git@github.com:blender/blender.git
To clone Bforartists with SSH:
git clone git@github.com:bforartists/bforartists.git
A tip is to also clone Blender to make sure Blender natively compiles on your system before compiling with Bforartists.
4. Make an Update
Now we need toliterally get all the "materials" and download the dependencies stored generally as LFS files and sub-modules. A submodule is another repository that has been linked to the main repository.
A quick command in the Powershell or Command Prompt will trigger the update, and you will routinely do this.
cd "C:\[Repository Path]\Bforartists"
.\make update
- This will prompt you to confirm if you would like to download the libraries and dependencies.
- Confirm to download.
This may take a while, so let it download.
If LFS is failing, download the LFS files for Blender/Bforartists with--skip-smudge:Then make the update again.
git lfs install --skip-smudgeNow revert the
.\make update--skip-smudgeand get LFS back to normal to show future errors:
git lfs install --force
If LFS is failing, download the LFS files for Blender/Bforartists with--skip-smudge:git lfs install --skip-smudge
You can alternatively update the LFS manually after installing the skip-smudge.git lfs fetch
git lfs checkoutgit lfs pull
Now revert the--skip-smudgeand get LFS back to normal to show future errors:git lfs install --force
5. Clean and Reset the Submodules (Optional)
A first make update will get you "headless" files and sync with the main branch at the date. This is normal behaviour. But if things are dirty and failing a build, which can be the case sometimes, you can reset and clean the libraries this way.
You can checkout the submodules to the main branch with these commands to first hard reset, clean then checkout:
git submodule foreach --recursive git reset --hard
git submodule foreach --recursive git clean -fd
Then make sure you update and checkout from the HEAD. If using TortoiseGit, this is sometimes called the FETCH_HEAD.
git submodule update --recursive --checkout
5. Getting Ready to Build
Before you compile you might want to update the repository (the blueprints) to download the latest changes.
Now you will need to fetch all branches available , then pull any recent changes to be up to date. This assumes we are on the main trunk, which would be the master.
1. Get latest changes and branches
First “Fetch” any changes
This updates the repository index with all the available branches, new commits and changes, etc. This command only updates the index, not the repository itself.
This can be done in the Powershell of Command Prompt:
git fetch --all
2. Download latest files
Then "Pull" the files
To download and update the repository on the current branch that you are in, you must do a “Pull”. And a "rebase" means to get all the commits in a timeline, so it's clean and the history is uniform.
git pull --rebase
Your repository should be up to date again.
You can use the TortoiseGit context menu for these as a short-hand. In the settings you can expose these operators to a higher level in the context menu.
3. Make Update
Like with chapter 4, we can run a handy shorthand to pull all LFS files and submodules files with one command. This is a reoccuring command to keep in mind to stay up to date.
.\make update
6. Install Dependencies
To build Cycles with all GPU dependencies for an official release build closest to an Blender official releases, you will need to install some third-party toolkits. This is optional, and can be disabled for faster builds or builds that don't require GPU troubleshooting - keeping in mind these require much RAM use.
To know the what is the latest configuration, you can load and see pipeline configuration versions from the repository here:build_files\config\pipeline_config.yaml
Setting up CUDA
Installing this will enable the CUDA rendering of Cycles.
Hitting “Next” “Next” “Next” to install is generally ok and risk free. Generally the Environment variables should be automatically added.
To troubleshoot: make sure the following System Variables Environment paths are correct:
CUDA_PATH = C:\Program Files\NVIDIA GPU Computing Toolkit\CUDA\v12.8

CUDA_PATH_V12_8 = C:\Program Files\NVIDIA GPU Computing Toolkit\CUDA\v12.8

Path = C:\Program Files\NVIDIA GPU Computing Toolkit\CUDA\v12.8\bin

Path = C:\Program Files\NVIDIA GPU Computing Toolkit\CUDA\v12.8\libnvvp
Setting up OPTIX
Installing this will enable the OPTIX rendering of Cycles.
Hitting “Next” “Next” “Next” to install is generally ok and risk free. Generally the Environment variables should be automatically added.
To troubleshoot: make sure the following System Variables Environment paths are correct:
OPTIX_ROOT_DIR = C:\ProgramData\NVIDIA Corporation\OptiX SDK 8.0.0
Setting up HIP
Installing this will enable the HIP rendering of Cycles.
Extract to a path with a folder name with no spaces. Hitting “Next” “Next” “Next” to install is generally ok and risk free. Generally the Environment variables should be automatically added.
To troubleshoot: make sure the following System Variables Environment paths are correct, assuming that C:\AMD\hip\ is where you installed/unpacked:
USER variable
PATH = C:\AMD\hip\bin
HIP_PATH = C:\AMD\hip\
HIP_PATH_64 = C:\AMD\hip\
Path = C:\AMD\hip\bin\
Important: Try to install or unpack to a folder path without spaces, or else the paths will fail.
Setting up HIP RT
Installing this will enable the HIP-RT for realtime raytracing rendering of Cycles.
1. Check if the HIP compiler is on the right version and paths detected first
hipcc --version
2. Download and unpack the AMD HIP-RT optimized SDK
Extract to a path with a folder name with no spaces, installing to the same location as the HIP ROCm in the previous dependency is recommended.
Example: C:\AMD\hip\hiprt
To troubleshoot: make sure the following System Variables Environment paths are correct:
USER variable PATH = C:\AMD\hip\bin
SYSTEM variablesHIP_PATH = C:\AMD\hip\HIP_PATH_64 = C:\AMD\hip\Path = C:\AMD\hip\bin\
Important: Try to install or unpack to a folder path without spaces, or else the paths will fail.
Setting up OCLOC
Installing this will enable the Intel One API SDK for rendering in Cycles. This can only be setup with Cmake build solutions, not console build solutions.
1. Download and Install
Hitting “Next” “Next” “Next” to install is generally ok and risk free. Generally the Environment variables should be automatically added.
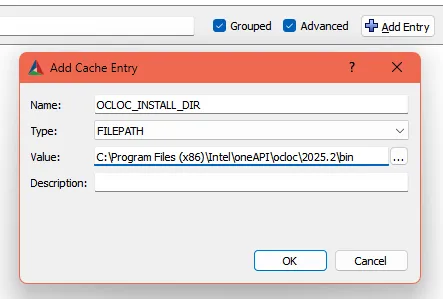
2. Add the Environment Paths to the Cmake solution
To the top right of the CMake dialogue there is a buttons called "Add Entry". Use this to add the OCLOC_INSTALL_DIR environment variable:
SYSTEM variables:
Type: FILEPATHOCLOC_INSTALL_DIR = C:\Program Files (x86)\Intel\oneAPI\ocloc\2025.2\bin
3. Turn One API device and binaries to the build solution.
Set both of these to ON then generate the Cmake solution.
WITH_CYCLES_DEVICE_ONEAPI=ON
WITH_CYCLES_ONEAPI_BINARIES=ON
This is to compile with Visual Studio using Cmake solutions, to compile from command line requires steps in chapter 8. Compile via Cmake
7. Quick Compile via Console
Once you have downloaded and installed everything and the repository is up to date. Now we need to compile the source code. There are two ways. The first method is easy and the second with more control.
When compiling from the console, everything happens automatically, including the target folder getting created. This is the easy way.
This way is to to type in Powershell or Command prompt and running these commands in the Source Repository folder.
Default build:
This is a build with essential features activated.
./make
Release Build
This is the official release build with most GPU dependencies available.
./make release
This build will take some time in the first compile. This will build with all GPU dependencies minus OCLOC.
To build with OCLOC for an official Release build, we need to make a custom Cmake with OCLOC, HIP and OPTIX configured manually.
When in the repository, run this as an example command:cmake -DCMAKE_BUILD_TYPE=Release -DHIP_HIPCC_EXECUTABLE="C:\ROCm\6.4\bin\hipcc.exe" -DOCLOC_INSTALL_DIR="C:\Program Files (x86)\Intel\oneAPI\ocloc\2025.0\bin" -DOPTIX_INCLUDE_DIR="C:\ProgramData\NVIDIA Corporation\OptiX SDK 8.0.0\include" -C "C:\blender-git\bfa\Bforartists\build_files\cmake\config\blender_release.cmake" -S .\Bforartists\ -B .\bfa-release-build -G Ninja
Note: You will need to make sure the Environment paths to OPTIX, OCLOC and HIP are correct and set to your system dependencies.
Then in the build solution folder that was generated called "bfa-release-build", run this:cmake --build . -j 4 --target install
Debug Build
This build is useful for finding bug, but most GPU dependencies are disabled. This build is relatively quick.
./make debug
Debug Lite
This is the fastest build with all GPU dependencies disabled, meaning this will essentially only compile operators and the interface. Good for quick iteration for the interface. This version usually compiles in 5-10 minutes.
./make lite
You can install Ninja to increase better multi-threaded compiliation times. To compile with Ninja do the following:
1. Download Ninja from https://ninja-build.org/
2. Unpack to a folder likeC:\Ninja
3. Add Ninja to the System Environment Path:Path = C:\Ninja4. Compile with the added command./make ninjato build a quick solution
8. Compile via CMake
Then there is the manual way. This one is good when you want to debug and toy around with different Cmake settings.
Time to fire up Cmake for the first time and create the solution file for Visual Studio. We recommend the way with Cmake so that you have full control. But for most cases the Quick Compile via Console works.
Preperation

This step is optional
On with some more preparations.
This step helps clarify what you will dowhen you choose the long compilation method: by configuring CMake manually and then compiling with Visual Studio by clicking at the *.sln file in the Cmake Build solution folder.
Configure Features
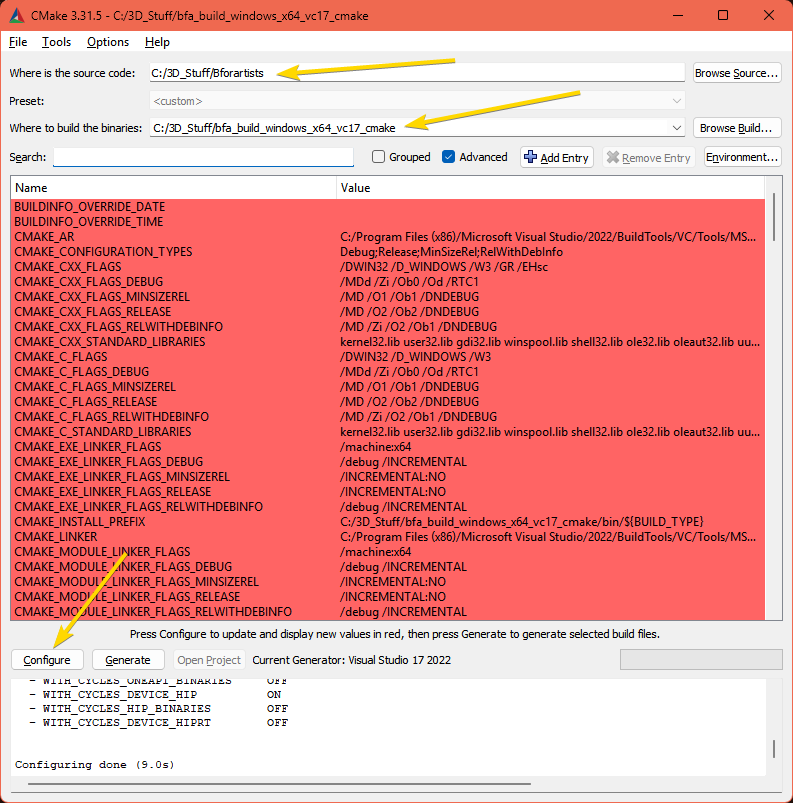
Enter the paths to the repository source code and to the build folder then click on Configure. In Cmake, set the path where you want to build the binaries solution
- Set the source code folder to the repository folder
- Set the build folder towhere you'd like to generate the build solution.
- Press "Configure"
- Configure which features you would like to use use
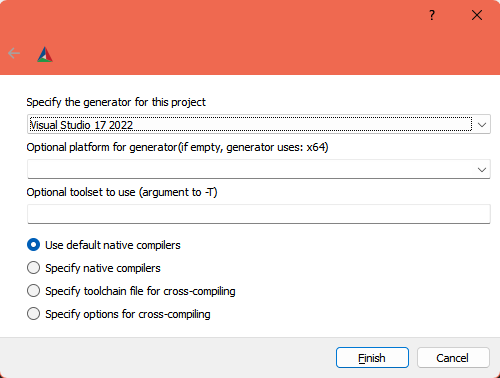
- A window will pop up asking you what Visual Studio version to use.
Usually you don't need to change anything here when you just have Visual Studio installed. Otherwise, Choose Visual Studio 17 2022 in the “Specify the Generator for this project” dropdown box to compile the 64 bit version.
You can also choose x64 in the Optional platform for generator dropdown box below. But leaving it blank will also work. It chooses x64 as the target platform automatically.
Here you can turn on/off features and per your requirements, including defining OCLOC, turning off GPU features, or turning hidden optional features on.
About Red Errors in the generated configuration
Sometimes, if there are incomplete libraries, missing or corrupt dependencies, and/or previous damaged builds, you might get errors in the bottom window in red.
If you have errors to resolve, skip ahead to the next step.
If you got no errors, only warnings, then you can proceed to the next steps.
Most errors are due to missing or misconfigured environment variables and/or library dependencies.
Activate Features
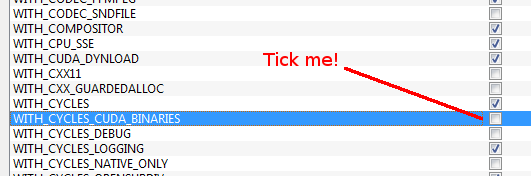
Activate all needed features as some features are off by default.
Somefeatures are off by default. Cuda Binaries, HIP, OCLOC, Optix, Alembic,Open VDB and Open Subdiv needs to be manuallyactivated. We activate CUDA to have GPU acceleration in the software.
The settings for a release version of Bforartists can be found in the build_files/cmake/config folder
in the repository. The blender_release.cmake file contains all needed settings.
The defaults are generally the fastest compiling times, but you canoptionally disactivate Cuda Binaries and the former to speed things up – but beware the default is pretty good.
Generate
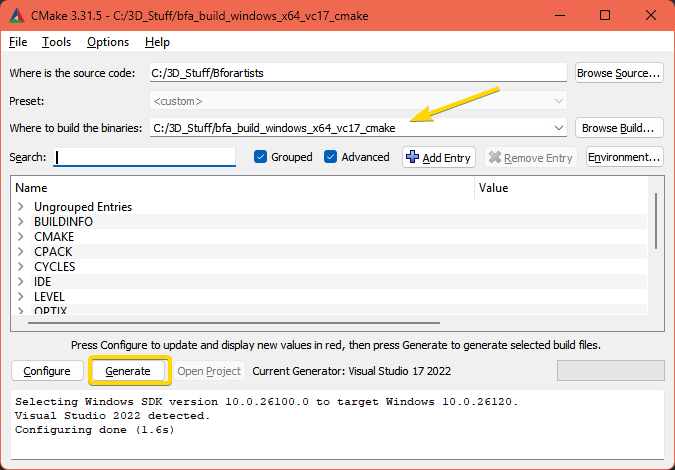
When all red errors are fixed, click on Generate. This will now create the solution files in the chosen build folder.
You can open the Blender.sln file in Visual Studio.
Generation is a requirement to generate a folder where Cmake builds the Binaries and where Visual Studio compiles the result.
- Press "Generate"
- Confirm Compiler
- This will create another folder with the *.SLN file to open with Visual Studio to compile.
Let Cmake generate through once. Then click Configure again. The second run will turn the upper window back to normal – where the option toggles are displayed.
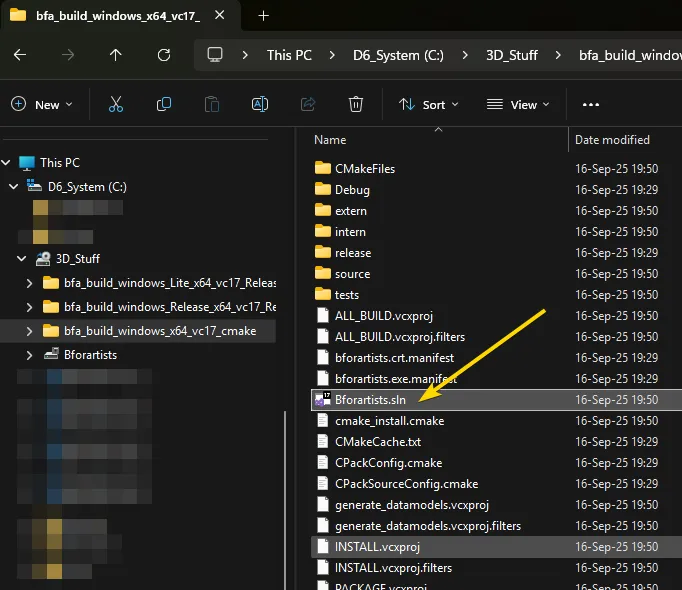
When all errors are fixed Click on Generate. This will now create the solution files in the chosen folder you previously made or created with Cmake. You can now open the Bforartists.sln file in Visual Studio.
Quick Note: the *.sln file may be called called Blender.sln. Bforartists is a Blender fork. And so big parts of the file structure and the project name is still Blender.
Compile
After generation, open the *.SLN with Visual Studio and Compile.
Finallywe arrive to the compiling part, the best part. Cmake shouldhave produced everything needed in the build folder.
Open the *.SLN file with Visual Studio by double clicking it or loading and using the open dialogue in Visual Studio.
- Click at the Blender.sln File to open Visual Studio.
- In Visual Studio, change the build type to Release (the project usually starts with Debug as a default, useful mostly for development only).
- Select the Install item in the Solution Explorer, right click on it, and choose Build.
- Visual Studio should now start the Build process.
- When everything works as expected, then you should have a result in the sub-fodler of the build solution under
bin/Release.
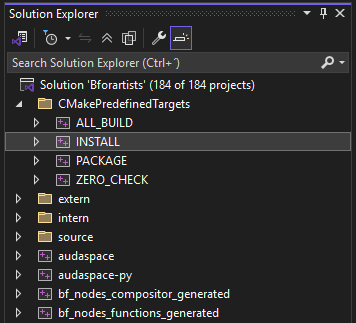
Once you have loaded it, run the CMakePredefinedTargets INSTALL in the Solution Explorer editor by right clicking the solution and pressing "Build". This will compile the file.
Alternatively you can run this command from a Command Prompt or Powershell from inside the build solution folder:cmake --build . -j 4 --target install
9. Conclusion
🥳 Congratulations!
You have compiled Bforartists for the first time. You should be able to work with the source code now.
Double click on the *.exe in the build solution folder in the /bin to run ands ee that everything is working fine. When it does, you are a winner.
Quick Tip: Now that it’s compiled, you can do Python code changes to the build data, and test it almost live. Don’t forget to copy your python changes that you've done fromthe bin/Release folder back to the repository or else when youre build, you will loose all changes!
For C code changes, you will need to do the changes in the repository before building, then re-build to test. If you get errors on re-build, just delete the old build in the bin/Release folder to clear the cache.


